A couple of years ago, whilst staying with friends in the north of France, I was lucky to be taken to a garden which holds one of the french national collections of Hydrangea. Not only was the afternoon memorable for the flowers, but also for the violent storm which came upon us, out in an open space, with lots of tall trees!
The garden was amazing, with lots of different bushes of these flamboyant shrubs. I grow quite a few in my garden as they do not seem to mind the clay soil, although they nearly all turn pink, even those bought as white!
I have never used any of the photos from that visit as a basis for a painting, but as I was going through my folder for something blue, I came across them and decided to have a go.
I am not a great one for masses of flowers in my paintings, so I simply used the photo to give me shape and colour.....not a great amount of the real blue I was originally planning on using!
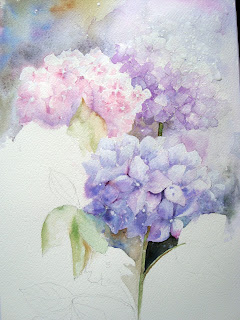
I did not do a complete drawing for this painting, as I was not sure how it would turn out, and did not want do a careful drawing and then spoil it with the paint. I simply drew, originally, 5 circles on the paper where I wanted the flower heads to be, and put all the detail I needed on the central flower head, and started by painting the one bloom
When I was happy and thought that the painting showed potential, I repeated the process with each of the flower heads, adjusting the position of the original circles and finally reducing the 5 down to 4......bad composition really!
All went well until I started painting the background.As you can see from the painting above, I had included some background above the flowers in order to outline the white areas of the flower tops.
I had intended to paint the lower left with a fairly strong set of washes, dark backgrounds being a bit of a signature feature of my recent work, but the whole thing went totally pear-shaped and I hated it. It was too heavy for the rest of the painting, I didn't get the greens of the leaves right, and the colours looked dirty against the delicate shades of the flowers.
As a last resort, because of the work that had gone into painting the flowers, I did something I have never done before, but had seen a friend do quite frequently. I put the whole of the bottom left corner under the cold water tap, and scrubbed away as much of the paint as possible. Thank goodness for good quality paper......my usual Fabriano Artistico Extra White 300g. It worked to a certain extent and I was able to re-paint and finish the picture. At this stage I did get a bit disheartened and did not give it the amount of time and enthusiasm that I usually give to the background, and the leaves got very little attention!
In order to try the save the painting, I gave everywhere a good splatter with white acrylic gouache, but I think even that was a bit overdone. I know it is naive to think every painting will succeed, and we should count ourselves lucky when 1 in 5 or so are satisfactory. Non-the-less it was disappointing after all the initial work. After leaving it propped up in the studio for a week or so, if I am still unhappy, I might cut out the flowers and use them in a collage!! .


Splendid! Enough said.
ReplyDeleteThanks Peter, I don't think I will ever be able to paint without gouache again. I have forgotten how to do traditional washes!!!
DeleteHello Yvonne:) I know, I'm so late with my comment, but I wanted to let you know that your flowers are beautiful! Even the splattering in my opinion isn't overdone. Love it!
ReplyDeleteThanks for the comment. I am glad you enjoy looking and experimenting yourself.
DeleteThis is beautiful! Love it!
ReplyDeleteThanks Mary, hope you continue to find lots to look at.
Delete